fman build system

Technical details on how fbs is meant to be used.
fbs is a Python-based build tool for desktop applications that use PyQt or PySide. It takes your source code and turns it into a standalone executable on Windows, Mac or Linux. It also lets you create an installer for your app.
The best place to get started with fbs is the 15 minute tutorial. If you haven't already taken it, it is highly recommended you do so. This Manual is meant as the next, more detailed resource.
fbs runs on Windows, macOS and Linux (Ubuntu, Arch or Fedora). You also need Python 3. The free version of fbs supports Python 3.5 and 3.6. Later Python versions require fbs Pro.
The easiest (and non-intrusive) way of installing fbs is via pip and a Python virtual environment. To create a virtual environment in the current directory, execute the following command:
python3 -m venv venv
Then, activate the environment with one of the commands below:
# On Mac/Linux:
source venv/bin/activate
# On Windows:
call venv\scripts\activate.bat
Next, use pip to install fbs and its
dependencies:
pip install fbs PyQt6
You can similarly install PySide6,
PyQt5 or PySide2. Using PyQt6 or
PySide6 requires
fbs Pro.
Your main point of contact with fbs will likely be its command line. For instance, the command
fbs freeze
turns your application into a standalone executable.
Other available commands are startproject,
run, clean and
installer.
Run fbs (without further arguments) to see
their descriptions. The
tutorial
shows them in action.
The easiest way to start an fbs project is via the following command:
fbs startproject
This prompts you for a few values:
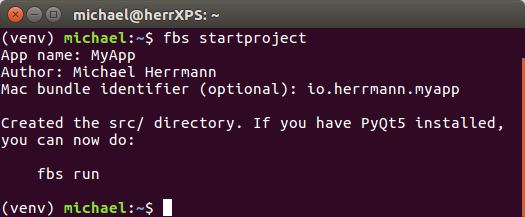
Once you have entered them, fbs creates a skeleton project
in the src/ folder of the current directory.
fbs projects use the following directory structure.
Parentheses (...) indicate that a file is
optional.
src/ |
Root directory for your source files |
build/ |
Files for the build process |
settings/ |
Build settings: |
base.json |
all platforms |
(mac.json) |
specific to Mac |
(windows.json) |
... |
(linux.json) |
all Linux distributions |
(arch.json) |
specific to Arch Linux |
(fedora.json) |
... |
(ubuntu.json) |
... |
(release.json) |
during a release |
main/ |
Implementation of your app |
icons/ |
Your app's icon. |
python/ |
Python code for your application |
(resources/) |
Data files, images etc. See below. |
(freeze/) |
Files for freezing your app |
(installer/) |
Installer source files |
(windows/) |
|
(mac/) |
|
... |
|
(requirements/) |
Your Python dependencies: |
(base.txt) |
on all platforms |
(linux.txt) |
on all Linux distributions |
(arch.txt) |
on Arch Linux |
| ... | ... |
As you use fbs, you will see that it generates output in a
folder called target/, next to the above
directories. It may also create a folder called
cache/, which you can delete whenever you want.
Finally, another typical (but not required) folder on
this level is venv/.
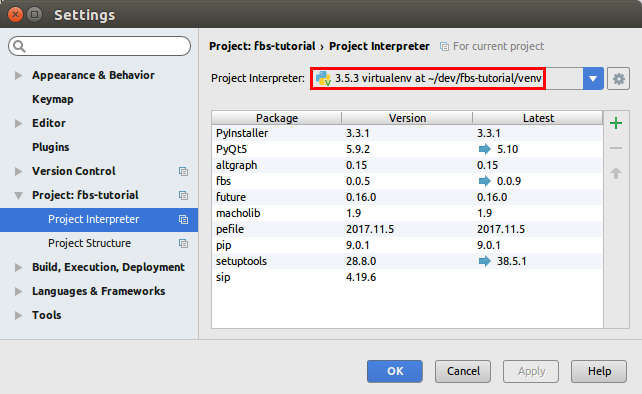
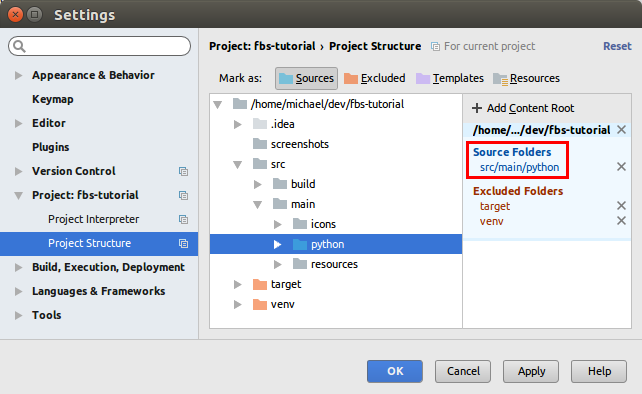
The command fbs run is great to quickly run
your app. Many people however prefer working in an IDE such
as PyCharm.
It especially simplifies debugging.
To run an fbs app from other environments (such as an IDE, or the command line), you simply
src/main/python on your
PYTHONPATH and
src/main/python/main.py.So for example on Mac and Linux, you can also run your app from the command line via
PYTHONPATH=src/main/python python src/main/python/main.py
(assuming the virtual environment is active).
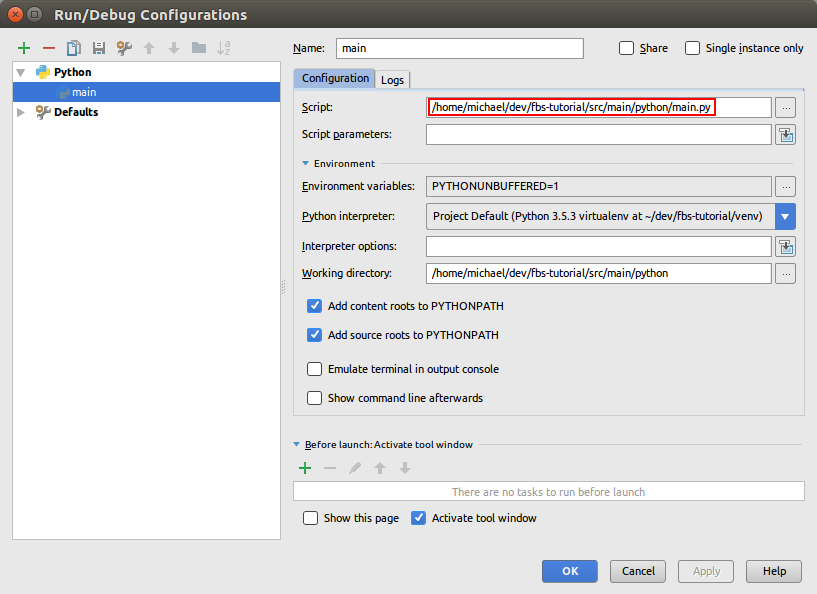
Here are screenshots of how PyCharm can be configured for this:
In order for fbs to find it, your Python source code must
lie in src/main/python/. There, you need a
script that starts your app with an
ApplicationContext.
The default script that is generated at
src/main/python/main.py when you run
fbs startproject looks as follows:
from fbs_runtime.application_context.PyQt6 import ApplicationContext
from PyQt6.QtWidgets import QMainWindow

import sys

if __name__ == '__main__':
    appctxt = ApplicationContext()       # 1. Instantiate ApplicationContext
    window = QMainWindow()
    window.resize(250, 150)
    window.show()
    exit_code = appctxt.app.exec()       # 2. Invoke appctxt.app.exec()
    sys.exit(exit_code)
The steps 1. and 2. are the minimum of what's required for fbs to work.
As your application grows in complexity, you will likely
want to split its source code across multiple files. In this
case, it is recommend that you place them all inside one
package. For instance, if your app is called My App then the
package could be called my_app and the
directory structure could look as follows:
src/main/python/
my_app/
__init__.pymain.pymodule_a.pymodule_b.py
If main.py is again the script that
instantiates the application context, then you need to
change the main_module setting in
base.json
to "src/main/python/my_app/main.py". This lets
fbs know about the new location.
A final tip for more complicated applications: Check out
@cached_property.
Together with
ApplicationContext,
it can really help you wire up the components of your app.
Most applications will use extra libraries to implement
their functionality. In the typical case, this is as simple
as pip install library on the
command line and import library in
your Python code. When fbs sees the import statement, it
automatically packages the dependency alongside your
application.
Sometimes, it can happen that automatic packaging does not
work for a particular library. That is,
fbs run works but running the output of
fbs freeze fails. A common symptom of this on
Windows is the following dialog when you try to run your
frozen app:
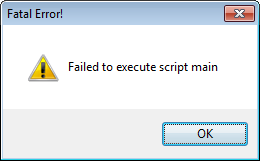
To debug this, add the --debug flag to freeze:
fbs freeze --debug
When you then start your frozen app from the command line,
you should get some debug output. If you see an
ImportError mentioning a module
xyz, add the following to
src/build/settings/base.json:
{
    ... ,
    "hidden_imports": ["xyz"]
}
If this does not help to fix a dependency problem, please search online for "<your library> PyInstaller". (fbs uses PyInstaller to package dependencies.) If that doesn't turn anything up, you may be able to get help on PyInstaller's issue tracker.
Once you are using a new library in your project, it is
recommended that you add it to the
requirements/ folder. For example, say
you are on Windows and have added the Windows-only
dependency somelibrary. Then you would create
the requirements/ folder next to
src/, copy
base.txt
into it and also create the following file
windows.txt there:
-r base.txt
PyQt6
somelibrary==1.2.3
The advantage this has is that other developers who check out your repository from version control can then quickly get all required Python libraries via the command:
pip install -r requirements/windows.txt
Further, some fbs commands such as
buildvm can only take
your dependencies into account if you follow the above
structure.
Applications often require data files beyond their source
code. Typical examples of this are images displayed in your
application. Others are .qss files, Qt's
equivalent of CSS.
fbs makes it very easy for you to include data files.
Simply place them in one of the following subfolders of
src/main/resources/:
base/ for files required on all OSswindows/ for files only required on Windows
mac/ ...linux/ ...arch/ for files only required on Arch Linux
fedora/ ...ubuntu/ ...
When you call fbs freeze, fbs automatically
copies the applicable files into your app's frozen directory
inside the target/ folder.
To access a resource file from your Python code, simply call
ApplicationContext#get_resource(...).
The tutorial gives an
example
of this.
In addition to the above, there are other directories you can use to include extra files.
Files in src/freeze/mac/, ... are
only included in the frozen version of your app. (So they're
not available when you do fbs run.) Their
canonical example is
Info.plist,
a meta file that tells macOS about the name of your
application, its version etc.
The folders src/installer/windows/,
... contain files for your installer on the
various platforms. For example: The file
src/installer/windows/Installer.nsi
contains the implementation of the Windows installer.
Consider
Info.plist
mentioned above. It contains the following lines:
...
<key>CFBundleExecutable</key>
<string>${app_name}</string>
...
Where does ${app_name} come from? The answer is
resource filtering: As fbs copies Info.plist
from
src/ to target/..., it replaces
${...} by the corresponding setting. For the
tutorial, app_name is defined in
base.json as follows:
{
    "app_name": "Tutorial",
    ...
}
So, the Info.plist that ends up in
target/ contains Tutorial and not
${app_name}.
To prevent unwanted replacements (eg. in image files),
resource filtering is only applied to files listed in the
setting files_to_filter. See the
file
mac.json
for an example.
A limitation of resource filtering is that it is not applied
during fbs run. In this case, the files you
obtain from
ApplicationContext#get_resource(...)
contain the placeholders unchanged.
The above descriptions and the tutorial lead up to the creation of an installer. But publishing a production grade app requires several more steps:
fbs accomplishes all of the above tasks when you run the following command:
fbs release
However, this command requires a few preparations.
The first step is to install a few more dependencies. To do this, please execute:
pip install fbs[upload]
Next, create an fbs account via the command:
fbs register
Alternatively, if you already have an account, you can use
fbs login to set its credentials.
The remaining preparations depend on your target operating system. They are discussed separately below.
Automatic updates are not yet implemented on Windows. If you
want to code sign your application, please see the
relevant section.
Otherwise, no special setup is required. Just run
fbs release to publish your app.
fbs does not yet implement either code signing or automatic
updates on Mac, so no special setup is required. Simply
execute fbs release to publish your app.
Unlike Windows, there is one thing to take into account when publishing your app: Try to build it on as old a version of macOS as possible. This improves the compatibility of your app with older versions of macOS. For example, an app built on macOS 10.10 is most likely to also run on 10.14, but not the other way around. Most people use virtual machines to run old versions of macOS.
Unlike on the other platforms, fbs fully implements code signing and automatic updates on Linux. The following gives you a minimal but complete example:
fbs startproject
fbs gengpgkey
fbs register       # or `login` if you already have an account
fbs buildvm ubuntu # or `arch` / `fedora`
fbs runvm ubuntu
# In the Ubuntu virtual machine:
fbs release
After the above, users on Ubuntu can install your app with the following commands:
wget -qO - https://fbs.sh/<user>/<app>/public-key.gpg | sudo apt-key add -
echo 'deb [arch=amd64] https://fbs.sh/<user>/<app>/deb stable main' \
  | sudo tee /etc/apt/sources.list.d/<app>.list
sudo apt-get update
sudo apt-get install <app>
What's more, users who install your app in this way automatically receive updated versions through their native package manager.
You can infer from the gengpgkey command above
that fbs uses a GPG key. This is the standard for
code signing on Linux.
The next command, register, lets you create an
account for fbs's backend. This is required so only you can
modify your app.
buildvm and runvm commands
Apps built on Ubuntu 16 usually run on Ubuntu 18, but not
the other way around. The buildvm and
runvm commands let you create and start virtual
machines running older Linux versions. For example,
runvm ubuntu starts a virtual machine
running Ubuntu 16. Building your app there maximises its
compatibility.
Using virtual machines for releasing your app has another benefit: The VM serves as an isolated environment. This makes your builds more reproducible. Also, it prevents you from having to install tools that are only required during a release. And from having to import GPG keys.
The two VM commands are implemented using Docker. You can
see this when you run docker images. For
example, after buildvm ubuntu:
michael:~$ docker images
REPOSITORY         TAG          IMAGE ID          CREATED           SIZE
myapp/ubuntu       latest       30abafe515e8      19 hours ago      1.03GB
The command buildvm ubuntu builds a Docker
image according to the instructions in
src/build/docker/ubuntu/Dockerfile. The
default implementation
performs the following steps:
venv/
directory.
requirements/.
When you then do runvm ubuntu, fbs mounts the
files from your project directory inside the container and
starts it. Because your files are mounted, any outside
changes you make to eg. src/... are immediately
visible. So eg. freeze always uses the current
version of your source code, even when run in a container.
On the other hand, some changes are not immediately visible
in the container. For example, the virtual environment is
only updated when you call buildvm. So you need
to re-run this command after
adding Python dependencies.
Similarly for when you set or change the GPG key.
Because of the way Docker works, runvm always
starts from the state created by buildvm. This
means that any changes you make inside runvm
are lost as soon as you type exit. So while it
may be tempting to call pip install somelibrary
inside the container, the results of this command will be
short-lived. As mentioned
above, you need to add
the dependency to
requirements/
instead.
The final caveat applies to the folders venv/
and target/ inside the Docker container. Unlike
other project files such as src/, these two
directories are not just mounted into the container. The
target/ folder actually points to
target/ubuntu (or .../arch etc.)
in your project directory. And venv/ does not
exist outside the Docker container at all.
fbs lets (and in fact encourages) you to release your app on multiple operating systems. The caveat is that fbs commands only ever target the current platform. That is, you for instance cannot create a Mac installer when running fbs on Windows. The solution to this is to use virtual machines to invoke fbs on different platforms. A video of fbs's creator shows examples of this in practice.
Another recent cool solution is to use GitHub Actions to automate the workflow for all OSs. Please see this repository by J. F. Zhang. A caveat is that if you are using fbs Pro, then you should only do this from a private GitHub repository. Otherwise, the whole world would be able to obtain your Pro credentials, which quickly gets them blocked.
Code signing is required to avoid warnings by the user's OS that your app is untrusted:

For code signing on Linux, see the section on releasing for Linux above. On macOS, fbs does not (yet) implement code signing. For instructions on Windows, see below.
On Windows, code signing certificates usually come in the
form of a .pfx file. To use it with fbs, place
it at src/sign/windows/certificate.pfx. Then,
set "windows_sign_pass" to the password for
this file in either
src/build/settings/secret.json,
.../windows.json or .../base.json.
Optionally, you can also set
"windows_sign_server" to the timestamp server
that should be used for signing. For example:
"http://sha256timestamp.ws.symantec.com/sha256/timestamp".
Next you need to ensure you have Windows's
signtool and that it is on your
PATH. For instructions how to do this, please
see
here.
Once you have performed these steps, you can use the
commands fbs sign and
fbs sign_installer to code sign your app's
frozen binaries and its installer, respectively.
Once your app is installed on somebody else's computer, you will want to know when errors (/exceptions) occur running your app. With associated stack traces, this can be invaluable for learning about problems and fixing them.
fbs can upload errors that occur in your app to Sentry. This gives you a web interface for inspecting exceptions and stack traces.
To enable error tracking for your app, create a Sentry account and project. This gives you a DSN / Client Key similar to:
https://4e78a0...@sentry.io/12345
Save this as a setting to your
src/build/settings/base.json. Also add the
setting's name to public_settings. For example:
{
    ...,
    "sentry_dsn": "https://4e78a0...@sentry.io/12345",
    "public_settings": ["sentry_dsn"]
}
Next, install the necessary dependencies via:
pip install fbs[sentry]
(Don't forget to also add this dependency to your requirements/.)
Now you can add SentryExceptionHandler to
the exception_handlers property of your
ApplicationContext:
from fbs_runtime import PUBLIC_SETTINGS
from fbs_runtime.application_context import cached_property, \
    is_frozen
from fbs_runtime.application_context.PyQt6 import ApplicationContext
from fbs_runtime.excepthook.sentry import SentryExceptionHandler

class AppContext(ApplicationContext):
    ...
    @cached_property
    def exception_handlers(self):
        result = super().exception_handlers
        if is_frozen():
            result.append(self.sentry_exception_handler)
        return result
    @cached_property
    def sentry_exception_handler(self):
        return SentryExceptionHandler(
            PUBLIC_SETTINGS['sentry_dsn'],
            PUBLIC_SETTINGS['version'],
            PUBLIC_SETTINGS['environment']
        )
This only sends errors for the frozen (i.e. compiled) form
of your app. fbs automatically sets the
environment setting to either
local for when you're developing locally, or
production for the
release version of your app. This
lets you distinguish the two in Sentry.
Often, you want extra information such as the user's
operating system when an exception occurs. You can set this
via the .scope property of the Sentry exception
handler. It is only available once the exception handler was
initialized, so you need to use the callback
parameter:
@cached_property
def sentry_exception_handler(self):
    return SentryExceptionHandler(..., callback=self._on_sentry_init)
def _on_sentry_init(self):
    scope = self.sentry_exception_handler.scope
    from fbs_runtime import platform
    scope.set_extra('os', platform.name())
    scope.user = {'id': 41, 'email': 'john@gmail.com'}
For more information about the additional data you can log this way, see Sentry's documentation.
Commercial desktop applications often require a license protection scheme. This prevents users who have not yet bought your app from using it. The typical vehicle for this are license keys: When a user purchases your app, you send them a license key that unlocks your application.
fbs makes it very easy for you to implement a reasonably secure license scheme. To do this, first install the necessary Python dependencies:
pip install fbs[licensing]
(Don't forget to also add this dependency to your requirements/.)
Then, use fbs's init_licensing command to
generate a public/private key pair. This will be used for
creating and verifying your license keys:
fbs init_licensing
The workflow then is as follows:
When a user buys your app, generate a license key via the Python code
# This file was generated by `init_licensing` above:
secret_json = 'src/build/settings/secret.json'
import json
privkey = json.load(open(secret_json))['licensing_privkey']
from fbs_runtime.licensing import pack_license_key
print(pack_license_key({'email': 'user@domain.com'}, privkey))
Say the user saves the output of the above
print(...) statement at
C:\license.key. Then your application can
verify that the user is licensed with the following code:
from fbs_runtime import PUBLIC_SETTINGS
from fbs_runtime.licensing import unpack_license_key

def get_license_key():
    with open(r'C:\license.key') as f:
        key_contents = f.read()
    return unpack_license_key(key_contents, PUBLIC_SETTINGS['licensing_pubkey'])
This raises FileNotFoundError or
fbs_runtime.licensing.InvalidKey if the user
does not have a valid license key. Otherwise, it returns the
key data {'email': ...}.
For background information about fbs's implementation, see
this article.
At some point, you may want to define your own commands in
addition to the built-in ones run,
freeze etc. For example, you may want to create
a command that automatically uploads the produced binaries
to your web site.
fbs lets you define custom commands via the
@command decorator. Create a file
build.py next to your src/
directory, with the following contents:
from fbs.cmdline import command
from os.path import dirname

import fbs.cmdline

@command
def hi():
    print('Hello World!')

if __name__ == '__main__':
    project_dir = dirname(__file__)
    fbs.cmdline.main(project_dir)
Then, you can execute the following on the command line:
python build.py hi
But also, you can execute all of fbs's built-in commands. For instance:
python build.py run
As your build script grows more complex, it is recommended
that you split it into two parts: Put the command
definitions (the "what") into build.py and
their implementation (the "how") into
src/build/python. (If you use this approach,
you will also have to add src/build/python to
sys.path at the beginning of
build.py.)
fbs consists of two Python packages: fbs and
fbs_runtime. The first implements the built-in
commands. The second contains logic for actually running
your app on your users' computers.
When you use fbs, you typically add references to
fbs_runtime to your source code. For example,
the
default main.py
does this with ApplicationContext from this
package.
On the other hand, your code does not necessarily have to
mention the fbs package.
Some functions in this package however are exposed to let
you define custom commands,
or to modify the behaviour of fbs's built-in ones.
What you usually don't want to do is to refer to
fbs from your application's implementation
(src/main/). If at all, you should only refer to
fbs from build scripts (build.py
and/or src/build/python/).
This class is the main point of contact between fbs and your
application. As mentioned
above, fbs requires you
instantiate it. It lies in the module
fbs_runtime.application_context.PyQt6 (or
fbs_runtime.application_context.PySide6 if you
are using PySide6) and has the following methods and
properties:
This method returns the absolute path to the
resource file with the given
name or (relative) path. For example, if you have
src/main/resources/base/image.jpg and call
get_resource('image.jpg'), then this method
returns the absolute path to the image. If the given file
does not exist, a FileNotFoundError is raised.
The implementation of this method transparently handles the
different subdirectories of src/main/resources.
That is, if image.jpg exists in both
src/main/resources/base and
src/main/resources/mac and you call it on Mac,
you obtain the absolute path to the latter.
This method also works both when you run your app from
source (via fbs run), or when your users run
the compiled form of your app. In the first case, the path
in src/main/resources is returned. In the
second, the path to the given file in your app's
installation directory. Do note that the files are only
filtered in the latter case.
This property holds the global QApplication object for your app. Every Qt GUI application has precisely one such object. fbs ensures that it is automatically instantiated.
You can use this property to access the QApplication object.
The canonical example of this is when you call
appctxt.app.exec(), as required by fbs.
Another reason why this property is exposed by fbs is that
this lets you overwrite it. For instance, you may want to
use a custom subclass of QApplication. Here is
how you might integrate it:
from fbs_runtime.application_context import cached_property
from fbs_runtime.application_context.PyQt6 import ApplicationContext
from PyQt6.QtWidgets import QApplication

class MyAppContext(ApplicationContext):
    @cached_property
    def app(self):
        return MyCustomApp(sys.argv)
    ...

class MyCustomApp(QApplication):
    ...

if __name__ == '__main__':
    appctxt = MyAppContext()
    ...
    appctxt.app.exec()
For more information about @cached_property,
see below.
This dict-like object exposes some build settings. A common use case is to display your app's version:
from fbs_runtime import PUBLIC_SETTINGS
print('Starting version ' + PUBLIC_SETTINGS['version'])
...
The available settings are controlled by the setting
"public_settings". Eg., in the
default base.json:
"public_settings": ["app_name", "author", "version"]
To extend this list, simply re-define it in one of your own
settings files, eg. base.json. You don't have
to repeat the elements above because fbs automatically
concatenates lists defined in multiple settings files.
The motivation for only making some settings "public" is that settings often contain secret information such as passwords. We don't want these to be included in the frozen form of your app.
Every application developer needs to answer the following
question: How do I wire up the different objects that make
up my application? fbs's answer to this is an interplay of
the
ApplicationContext
class and @cached_property.
fbs encourages (but does not force) you to instantiate all
components in your application context. For example: Say you
have a Window class, which displays some
information from a Database. Your application
context could look as follows:
from fbs_runtime.application_context import cached_property
from fbs_runtime.application_context.PyQt6 import ApplicationContext

class AppContext(ApplicationContext):
    @cached_property
    def window(self):
        return Window(self.db)
    @cached_property
    def db(self):
        return Database()
    def run(self):
        self.window.show()
        return self.app.exec()

if __name__ == '__main__':
    appctxt = AppContext()
    appctxt.run()
When run() is invoked when your application
starts, its first line accesses self.window.
This executes the code in the definition of the
window(...) property. This accesses
self.db, which in turn executes the code in the
definition of db(...). The end result is that
we instantiate both Database and
Window, without a long stream of spaghetti
code.
Taking a step back, we see that the application context
becomes the "home" for all of your application's components.
Making it the one (and only) place where components are
instantiated makes it extremely easy to see how the
different parts of your application are connected. What's
more, @cached_property ensures that each
component is only created once: Subsequent calls to the same
property return the result of the previous access.
Technically speaking, @cached_property is
simply a Python
@property
that caches its results.
Having a central place / mechanism for wiring up components is a well-known technique called Dependency Injection. For further information, see for instance this article.
This module exposes several functions that let you determine the platform your app is executing on. Their names should be pretty self-explanatory:
is_windows()is_mac()is_linux()is_ubuntu()is_arch_linux()is_fedora()is_gnome_based()is_kde_based()
Another function of potential interest is
name(). It returns 'Windows',
'Mac' or 'Linux', depending on the
current operating system.
The most important parts of fbs's API are described above.
But there are more functions which you can use. They are
documented in (extensive) comments in
fbs's source code. You can consider everything whose
name doesn't start with an underscore _ a part of
the public API.