fman build system

Create a working chat client with Python.
This Python Qt tutorial shows how to create a (working!) chat client for Windows, Mac or Linux. We will install Qt for Python, write the client and build an installer for it.
Qt is a GUI framework. It is developed in C++. But in 2018, the Qt company released Qt for Python. This gives you the increased productivity of this dynamic language, while retaining most of the speed of C++.
Before Qt for Python came out, most people used a library called PyQt. It is more mature, and very stable. Its drawback is that it requires you to purchase a license for commercial projects. This is unlike Qt for Python, which is licensed under the LGPL and can thus normally be used for free.
From a code perspective, it does not make much of a difference which of the two bindings you use. Their APIs are almost exactly the same. We use Qt for Python here because it is newer. If you want to use PyQt instead, check out this PyQt5 tutorial.
Installing Qt in Python 3 is very easy, thanks to the venv and pip modules. Open a terminal and navigate to an empty directory. Assuming Python's installation directory is on your PATH, you can then enter the following:
python -m venv virtualenv
This creates a virtual environment in the
virtualenv directory. It will store your
project's dependencies.
To activate the virtual environment, use one of the following two commands:
call virtualenv\scripts\activate.bat  # on Windows
source virtualenv/bin/activate        # On Mac / Linux
You can tell that the activation was successful by the
(virtualenv) prefix in your shell:

For the remainder of this tutorial, we will assume that the virtual environment is active.
To install Qt for Python, enter the following command:
pip install PySide2
It's called PySide2 for historical reasons:
PySide were the first official Python bindings, released in
2009 by then-owner of Qt Nokia. After Nokia sold Qt in 2011,
development of PySide stalled. PySide2 was a
community effort to maintain it. Finally, in 2016, the Qt
company
committed
to officially supporting this project.
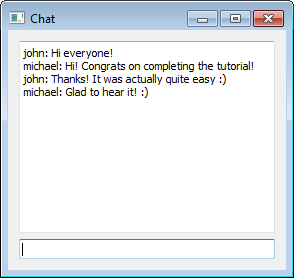
We will now use Qt for Python to create a (working!) chat client. Here is what it looks like:
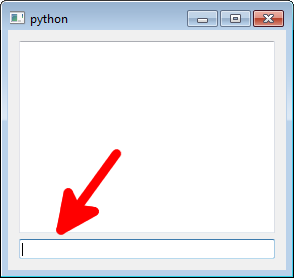
We'll build this top to bottom. First, the text area that displays everybody's messages:
To display it, start python in your terminal
and enter the following commands:
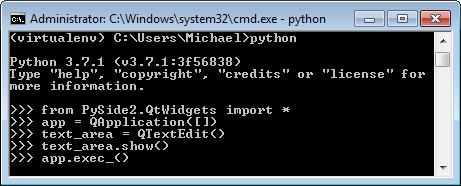
The first line tells Python to load PySide:
from PySide2.QtWidgets import *
Next, we create a QApplication. This is
required in any Qt application. We pass the empty brackets
[] to indicate that there are no command line
parameters:
app = QApplication([])
Then, we create the text area via the line:
text_area = QTextEdit()
We tell Qt to display the text area:
text_area.show()
This opens a window. To make it respond to user input, we finally need the following command:
app.exec()
Now Qt processes key strokes, mouse events etc. until you close the little window that contains the text field.
If the above worked as in the screenshot then congratulations! You just created a very simple GUI application with Qt for Python.
We now want to add the text field for entering messages below the text area:
But how do we tell Qt to place it below (and not, say, to the right of) the text area? The answer is through a layout. Layouts tell Qt how to position GUI elements.
To put the text field below the text area, we use a QVBoxLayout as follows:
from PySide2.QtWidgets import *
app = QApplication([])
layout = QVBoxLayout()
layout.addWidget(QTextEdit())
layout.addWidget(QLineEdit())
window = QWidget()
window.setLayout(layout)
window.show()
app.exec()
We again import PySide2 and create a
QApplication. We proceed to build the layout:
First a text area like the one we had before. Then a text
field of type
QLineEdit.
Next, we create a window to contain our layout. We end by
calling .show() on it and using
app.exec() to hand control over to Qt.
QWidget,
which we saw above, is the most basic GUI element in Qt. All
other controls are specialisations of it: buttons, labels,
windows, text fields, etc. Widgets are like HTML elements in
that they encapsulate looks and behaviour, and can be
nested.
Here is a screenshot of the most important Qt widgets:

It for instance shows:
(The code for the screenshot is available here for your reference.)
With the GUI ready, we need to connect it to a server. The
easiest way to do this is via the requests
library. You can install it via the command:
pip install requests
Once you have done this, start python again and
enter the following commands:
from requests import Session
server = Session()
chat_url = 'https://build-system.fman.io/chat'
server.get(chat_url).text
This should give you the last chat messages.
We can also send a message. Here is an example, but be sure to use your own name and text :-)
server.post(chat_url, {'name': 'Matt', 'message': 'This works! :)'})
When you then call
server.get(chat_url).text again, you should
see your message.
Our chat client needs to handle certain events:
Enter, the current
message should be sent to the server.
Qt uses a mechanism called signals for reacting to events such as user input or timers. Here is an example:
from PySide2.QtWidgets import *
from PySide2.QtCore import QTimer
app = QApplication([])
timer = QTimer()
timer.timeout.connect(lambda: print('hi!'))
timer.start(1000)
app.exec()
When you run this code, the message hi! appears
in your terminal once per second:
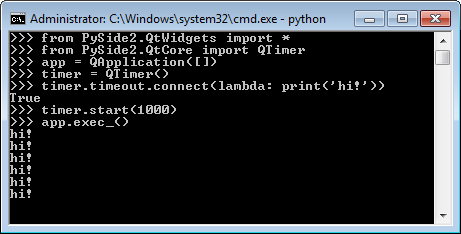
The signal in the above code is timer.timeout.
We used its .connect(...) method to specify a
function that gets called when the signal occurs. In the
example, we used the inline function
lambda: print('hi!'). Our other call
timer.start(1000) then ensured that Qt runs
this function every 1,000 milliseconds.
We are now in a position to fully implement the chat client.
Copy the below code into a file next to your
virtualenv directory, say as
main.py. Be sure to fill in your name at the
top, or you won't be able to post messages. Then you can run
the chat with the following command:
python main.py
You'll be able to see what others have written and send messages of your own. Happy chatting! :-)
from PySide2.QtCore import *
from PySide2.QtWidgets import *
from requests import Session

name = '' # Enter your name here!
chat_url = 'https://build-system.fman.io/chat'
server = Session()

# GUI:
app = QApplication([])
text_area = QTextEdit()
text_area.setFocusPolicy(Qt.NoFocus)
message = QLineEdit()
layout = QVBoxLayout()
layout.addWidget(text_area)
layout.addWidget(message)
window = QWidget()
window.setLayout(layout)
window.show()

# Event handlers:
def display_new_messages():
    new_message = server.get(chat_url).text
    if new_message:
        text_area.append(new_message)

def send_message():
    server.post(chat_url, {'name': name, 'message': message.text()})
    message.clear()

# Signals:
message.returnPressed.connect(send_message)
timer = QTimer()
timer.timeout.connect(display_new_messages)
timer.start(1000)

app.exec()
When you run the above code, you may notice that it feels
somewhat slow. The reason for this is that Qt cannot process
other user input while it is invoking our
display_new_messages() function. Because this
function takes a few hundred milliseconds to receive a
response from the server, and because it is called every
second, this means that the GUI is unresponsive most of the
time.
To fix this, we will add some parallel processing via threads. The idea is that Qt keeps handling user input in the so-called main thread while another thread fetches new messages from the server in the background.
The necessary code is below. Simply paste it over the
definition of the display_new_messages function
above.
from threading import Thread
from time import sleep

new_messages = []
def fetch_new_messages():
    while True:
        response = server.get(chat_url).text
        if response:
            new_messages.append(response)
        sleep(.5)

thread = Thread(target=fetch_new_messages, daemon=True)
thread.start()

def display_new_messages():
    while new_messages:
        text_area.append(new_messages.pop(0))
The code starts a Thread that runs a new
function, fetch_new_messages, in the
background. This function uses an infinite
while loop to load new messages from the server
and to place them in a list of new_messages.
The new implementation of display_new_messages
then processes this list to display the messages in the GUI.
There are several things to note about the above snippet:
First, remember that also the new implementation of
display_new_messages is connected to
timer.timeout and thus gets called every
second. Further, the call sleep(.5) prevents us
from flooding the server with too many requests.
But the most subtle point is this: Why didn't we just call
text_area.append(...) inside of
fetch_new_messages()? We could have avoided
the complicated use of new_messages.
The reason for this is that we now have two threads running
in parallel: Qt's main thread (which executes when you call
app.exec()) and our thread above.
At any moment, neither thread knows what the other one is
currently doing. But consider: What if Qt happens to render
the text area while the background thread is in the middle
of calling text_area.append(...)?
The answer is typically a crash.
We therefore do not make changes to the GUI from background
threads. On the other hand, because our
display_new_messages() is invoked by Qt, and
thus in the main thread, it can safely do it. Finally, the
above relies on the fact that Python's list functions
.append(...), .pop(...) etc. are
atomic and thus thread-safe.
We can now start the chat app with the command
python main.py. But how do we run it on
somebody else's computer? Especially if they don't have
Python installed?
What we want is a standalone executable that does not require Python (or anything else) to run. The process of creating such a binary is called freezing in Python.
Special Python libraries such as PyInstaller let you freeze applications. Unfortunately, they only get you 80% of the way. Very often, you still have to manually add or remove DLLs or shared libraries. And they don't address basic tasks such as accessing data files, creating installers or automatic updates.
We will therefore use a more modern library called fbs. It is based on PyInstaller but adds the missing 20%. You can install it via the following command:
pip install fbs
To start a new fbs project, enter:
fbs startproject
This asks you a few questions. You can use Chat as the application name and your name as the author.
Once you have done this, please
download this file
and copy it over src/main/python/main.py.
Open the file with a text editor and replace
name by your name. The following command then
starts the Chat as before:
fbs run
But what's more, you can now create a standalone executable via the command:
fbs freeze
This freezes your Python code to the folder
target/Chat. You can copy this directory to any
other computer with the same OS as yours to run the Chat
there. Isn't that awesome?
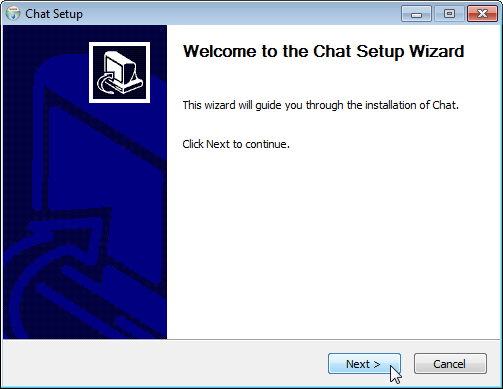
You can also use fbs to generate an installer. This is done
with the command fbs installer:
(On Windows, this step requires
NSIS to
be on the PATH. On Linux, you need
fpm.)
If you have an existing application that you wish to convert to fbs, this article may help you. It is written for PyQt, but is equally applicable to Qt for Python / PySide. Another good source of information is fbs's tutorial.
We saw above how Qt for Python can be used to create a
simple desktop application. We used basic widgets such as
QTextEdit
and
QLineEdit,
as well as
QVBoxLayout to arrange them. Qt's
signals let us make this GUI dynamic: First by
using a timer to fetch the latest messages from the server
every 1,000ms. And second by letting us respond to the user
pressing the Enter button to submit a message.
Finally, we used
fbs
to easily create a standalone executable and an installer.
If you would like to learn more about creating desktop applications with Python and Qt, check out my book:
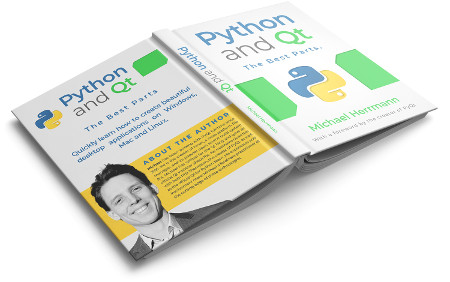
It covers both Qt for Python and PyQt6. (If you recall from above, the two can be used interchangeably.) It contains a foreword by Phil Thompson, the creator of PyQt. He says the book is "very good". So take a look!

Michael has been working with Python and Qt since 2016, when he started fman, a cross-platform file manager. Frustrated with the many difficulties of creating Python / Qt apps, Michael open sourced fman's build system (fbs). It lets you create GUIs with Python and Qt in minutes instead of months. Recently, Michael also wrote a book about Python and Qt.